


Elliptical Dish Installation Guide
Shaw Direct uses both the Anik F1 (107.3°W) Anik F2 (111.1°W) satellites.
It is important not underestimate the detail involved in pointing your dish accurately to obtain maximum performance. The satellite broadcasts with power equivalent to only a 50 watt light bulb so proper installation of the dish is critically important. If you follow these instructions carefully, you will not have much difficulty in optimizing the signals for your system.
This guide focuses on the alignment procedure of your satellite antenna. You should still read the installation instructions provided with your satellite antenna and receiver and make sure your antenna is grounded before considering the installation to be over!
Always make sure that your satellite receiver is on channel 299 while you are searching for the signal.
Site Survey
Consult the look angles calculator and record the compass heading and elevation for the location nearest you. Before you install the antenna, you must ensure that the location you select will allow a clear line of sight to the satellite. No trees or buildings can be situated where they will block the signal from reaching the dish. For more information on how to perform a site survey, please see our site survey page.
Ensure that the placement of the dish will allow the mount to be securely fastened so the antenna will not come loose or be misaligned due to strong winds, or be subjected to accidents or vandalism.
When determining where to mount the antenna, carefully plan how and where to run the coax cable. Consideration must be given regarding where to access the building, finished rooms or ceilings that must be contended with and how to get the cable to the receiver location.
Critical Settings
After the dish and LNBF are assembled and mounted as per the instructions packaged with the dish, there are three critical settings that must be made to properly complete the install:
- Dish rotation (skew)
- Elevation (inclination)
- Direction (azimuth)
These three settings are listed by the look angles calculator. The compass readings have not been corrected for magnetic variation so you should consult the magnetic deviation chart to get compass values on your azimuth (and you should also know how to use a compass, i.e. 0 = North, 90 = East, 180 = South and 270 = West).
Tools
The tools required to complete the antenna and LNBF positioning process are:
- A 7/16" wrench,
- A common screwdriver,
- A pair of pliers,
- A compass,
- A drill to mount the antenna base
- A ladder if the antenna is to be mounted on a high location
The LNBF
The Quad LNBF does not need any adjustments. Simply set it on the arm of the antenna per included instructions. You may connect your receiver to any of the 4 outputs on the LNBF. They all provide the same output.
Positioning the Antenna
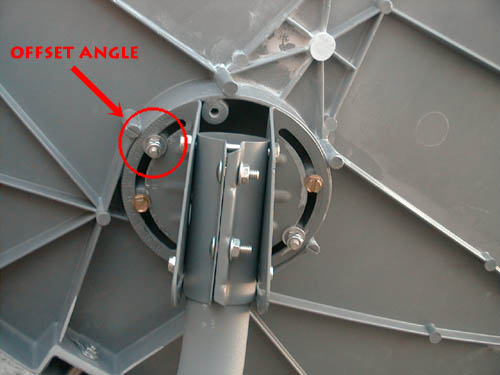
The skew should be adjusted using the scale at the back of the dish.
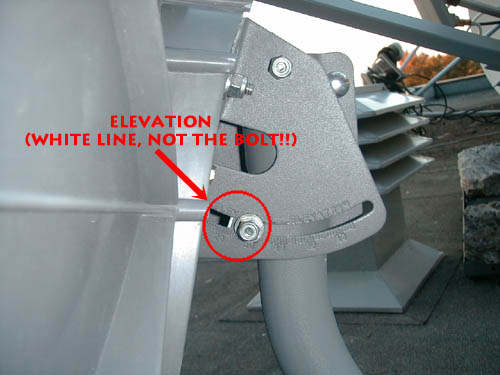
The elevation should be set using the white line (not the bolt!).
Connecting the receiver to the antenna:
Always connect the receiver to the power outlet last. Failure to do so could damage your receiver.
- Feed one end of the coax cable up from the bottom of the Mast Stand Pipe, through the pipe and out at the top. Tighten the coax cable onto the LNBF by hand only.
- Run the coaxial cable into the house and connect it to the "Satellite In" threaded terminal on the rear panel of the receiver.
Receiver Settings:
- When the receiver is plugged in the first time, you should wait 30 seconds, then press the Power button.
- With the remote control, set the receiver to channel 252 (DSR600 / DSR605 / DSR630).
- Press "Option 4-7" to get to the signal menu
- Pay attention to "Line C"for Tuner 1 and "Line E"for Tuner 2
- You should get a signal strength bar. If the Signal Strength value is zero, verify that all connections from the LNBF to your Shaw Direct receiver are correct and secure. Double check that the coax cable from the dish is connected to the "Satellite In" terminal at the back of your receiver.
- Align the antenna using values obtained from the look angles calculator. The receiver will react slowly once you hit the satellite and the small "Dish Logo" in front of the receiver will change from Red to Green.
Tuning to the Satellite:
If you are having difficulty tuning to the satellite, here are a few pointers:
Skew (Rotation), Azimuth (Direction) and Inclination (Elevation) tuning:
- Adjust the skew (rotation) of the antenna for your location.
- Make coarse adjustments of the antenna by setting it to the right elevation and direction
- Rotate the antenna slightly to the west (right) of where you think it should point.
- Do not move the dish too fast! Be patient and go slowly!
- Once you hit Anik F1, the signal bar will react within a few seconds.
- If you have not found F1 after 30mn of searching, double check your cable connections, make sure that the dish is not obstructed by trees or buildings.
- The chances of the LNBF being defective are very low.
- Make sure that the center copper lead of the coaxial cable is not in short circuit with the braid of the coaxial cable.
- You can use any of the outputs on the Quad LNBF - they are all the same.
- If you still can't find it, give us a call or send us an email for assistance.
Activation
- Set your receiver on Ch. 252.
- Go to Option 4-7 to get the Trip Counter.
- When a "hit" is sent to your receiver, the counter will increase.
- Notice the Map Status change to 525-4323 (xKu LNBF, the first 3 digits can differ from 525).
- The Map status change from "Loading" to "Complete".
- Check Ch. 299 (Preview) and Ch. 700 (SRC) to confirm reception on both satellites.
Following activation, do not change channel for at least 30mn to give the receiver a chance to load its channel map and Guide (EPG).
Fine Tuning
To get the maximum performance from your system and to ensure that you can enjoy uninterrupted programming, you should spend some time fine tuning your system.
- If you get a "Green" response, you are on the correct satellite.
- Go to Option 4-7 and wait a few seconds to see the Eb/No value of your signal.
- A value below 6 on channel 299 is "weak", a value between 6 and 9 is "good" and a value above 9 is "excellent".
- While watching the signal to noise ratio or by having someone relay it to you, use your hand very gently to apply slight pressure to one side of the dish, then the other to see if you can increase the value. If you can increase it, try to move the antenna very carefully to the optimal position and tighten the bolts gently.
Note: Prior to being authorized (activated), your receiver will not be able to download a proper channel map, load the on-screen-guide or even display an image channel 299. This is normal. Prior to activation, you with only get a message similar to "Please wait a moment, we are processing your request" on the screen.
You will not be able to check your signal strength and quality on the Anik F1 satellite prior to activation! Once the receiver is activated, leave it on Ch. 252 and give it time to load the channel map (525-4323 until "Complete" under Option 4-7 for an xKu LNBF). Go to channel 299 to check the signal strength and quality of Anik F1 and channel 700 for Anik F2..